2.2. Running
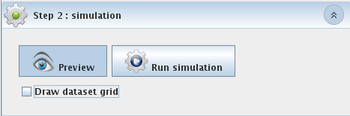
Fig. 2.4 Step 2, simulation
You may want to preview the simulated area. Click on the “Preview” button. The main interest in previewing the area is that the application will check if the simulation is correctly set up. Here “correctly” does not mean you made a relevant parametrization in terms of physics or biology, but at least the application had found all the parameters required for starting the simulation. More specifically, Ichthyop will attempt to read the geographical variables (longitude, latitude and depth) from the dataset in order to draw the area. It should also display the release and the recruitment zones if they have been defined and activated in the configuration file. Make sure what you see is what you expect, and go back to “Step 1: configure” in case not.
When the preview is satisfactory, click on “Run simulation” for starting the simulation. The progress bar will give an estimation of the remaining time for the simulation to complete. You can interrupt (but not pause) the simulation anytime by a click on “Stop simulation”.
Depending the capabilities of your computer, the number of released particles, how many actions are implemented, etc. the simulation might requires a large amount of the available dynamic memory and the application might look like it is frozen. Wait until the simulation run to completion. Refer to section “Java Heap Space” if the application crashes because of memory problem.